Monday, April 25, 2011

Split Pea Soup & Brussel Sprout Salad - what?

Split pea soup was one of those dishes I never liked.  I don't know if it was a texture thing or if it was from seeing the Exorcist one too many times but I could not stomach it.


But now..........well, obviously my tastes have changed because I would not be writing this if they hadn't.


This soup is always best when you use a leftover ham carcass from a previous meal. Of course, split pea soup can be made without it but the ham adds that nice salty, smoky richness I love. 


I'm all about the pig.


Here is what you need:


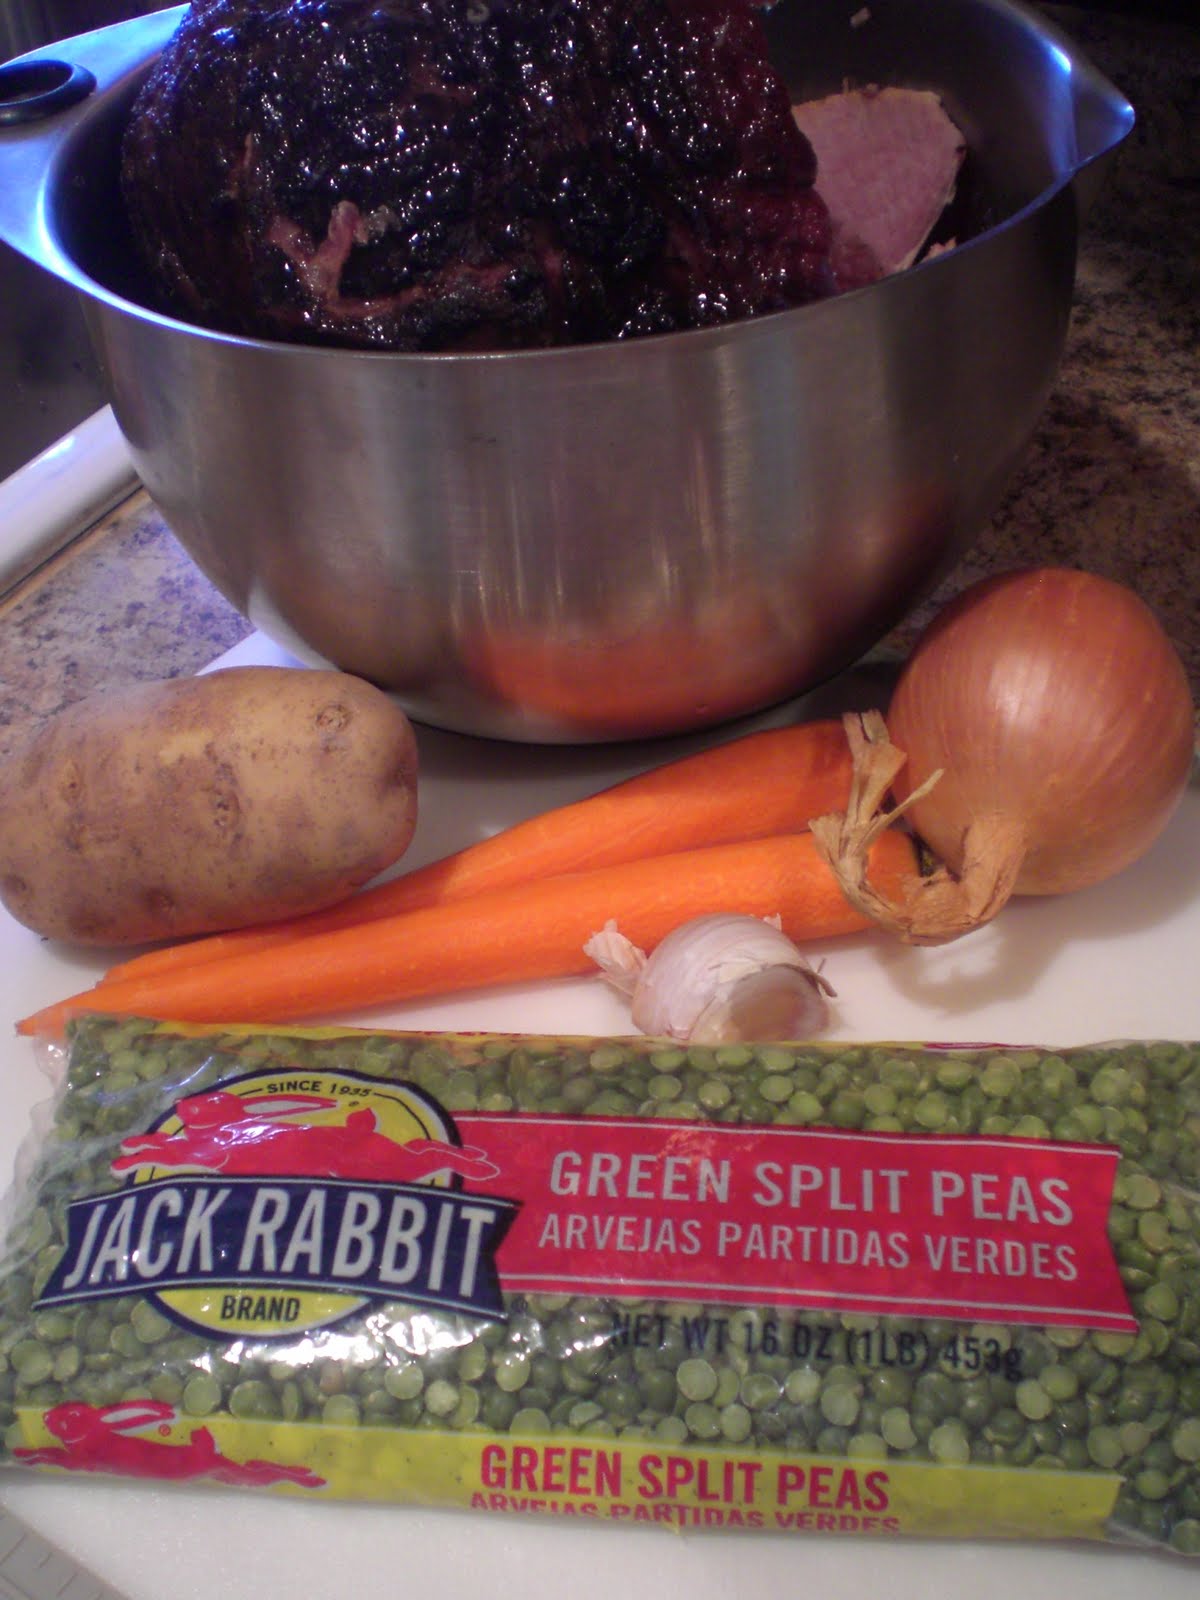
1 ham carcass - mine was the bone and etc from a spiral ham
2 Tbsp olive oil
1/2 - 1 whole peeled and diced onion
1-2 garlic cloves diced
2 carrots, peeled and diced
1 russet potato, peeled and diced
1 package of dried green peas
7 cups water
1/2 cup heavy cream
hot sauce (optional)
diced ham (optional)
sour cream (optional)


Here is what you do:


On a large cutting board, peel and dice your garlic, onion, carrot and potato. 


In a large soup pot, heat the 2 Tbsp olive oil.  Add all your veggies and cook approximately 3 minutes or until onions start to become slightly translucent.  No need to get too crazy here - you will be cooking the soup for awhile so all of your vegetables will heat through.


Meanwhile, in a small colander, rinse and drain the peas.  Remove any peas that don't look good - ie - brown/cracked/just don't look right.


Add the peas, ham bone and 7 cups of water to the pot.  Lower heat to a simmer and cook approximately 1 1/2 hours.


Remove the ham bone.  If there is any meat left on the bone that is still salvageable, slice it off and , dice it and reserve on the side until soup is finished cooking.


Taste the soup at this point to adjust the seasoning.  You may need to add a little salt depending on how salty or not salty the ham is.  I always add some pepper and 3-4 dashes of hot sauce to give it a little something something.


Now, you have two options at this point. (1) Leave the soup as is  or (2) Puree the soup
I like to do a little of both.  I guess that would be option (3). 


Like I said before, I have texture issues.  I'm also not a big fan of pureed soups.  I need to chew my food - even if it is soup.  I take a potato masher and slightly mash some of the peas, potatoes, etc together to make the soup a little thicker. Not mashed completely mind you.  Just a little - maybe half of the veggies so you can still see chunks.  You can also use a handheld immersion blender if you have one and feel like washing another tool. For me, the potato masher is how I roll.


Now that you have mashed your veggies - or not - it is time to add the 1/2 cup of heavy cream and heat until soup comes to a slight simmer and thickens.  I think this step adds a certain amount of creaminess and richness, but, if you choose, you can leave the cream out. 


Now it is time to serve it up.


I like to add a little dollop of sour cream at the end and a little sprinkling of diced ham. 


And there you have it!  See those chunks of carrot and ham floating around?


Yum yum super yum!


Couple notes -


If you do not have a leftover ham bone you can still make this soup.  Substitue chicken broth for the water to give it some extra flavor, throw in some ham pieces or even some cooked bacon. 


If you are a vegetarian, eliminate the meat and substitute a good vegetable broth for the water.


You can add some additional vegetables like celery or peppers.  To make it thicker, throw in another potato or two.  You can also add some chopped jalapeno to make it a little spicier. 


Remember, it's your kitchen.  Everyone has different tastes, likes and dislikes.  Make it your own.


But try it - you'll like it!  Don't I sound like a Mom? 


Oh, and speaking of trying something that maybe you might not have liked before.  Here is what I had for lunch today...............


That would be a cold brussel sprout salad with dried cranberries and diced ham in a sweet vinaigrette topped with Manchego cheese.


Holy!! 


Whoever thought of having brussel sprouts - not cooked and in a salad?  It's a whole 'nother ball game my friend.  The brussel sprouts are nice and crunchy and not nearly as bitter as when they are cooked.


If you are feeling super adventurous but aren't "feeling" the pea soup, give this one a whirl................


 2 containers Brussels Sprouts - about 1/2 pound - stems cut off and leaves pulled apart
1/4 cup dried cranberries or your choice of dried fruit
1/2 to 3/4 ounce of Manchego* cheese


1 cup extra virgin olive oil
1 Tablespoon Agave Nectar* or honey
3 Tablespoons red wine vinegar (or your choice of vinegar)
1/4 teaspoon lemon zest
2 teaspoons fresh lemon juice
1 garlice clove minced
1 teaspoon stone ground mustard
salt &pepper to taste

In a large bowl, mix together the brussel sprout leaves, cranberries and about 1/2 of the manchego cheese.  I like to shave the cheese with a vegetable peeler so they are in long thin slices. 

For the dressing - whisk together the agave nectar, vinegar, lemon juice, lemon zest, mustard and garlic clove.  Slowly whisk in olive oil just until combined.  Adjust to your taste with salt and pepper. 

Toss salad with some dressing and enjoy!

As always - couple side notes:

You may not need all of the dressing so it can be stored in the refrigerator for about a week.

I added some diced ham since it was leftover from Easter.  I'm all about using up the leftovers!  I also threw in a handful of dried cherries since they were on hand. Otherwise, some sliced onion or toasted nuts would be great tossed in as well.

*Like I said above, the agave nectar can be substituted with honey.  I love to use agave (pronounced ah-GAH-vae by the way).  It is a natural sweetener. And, agave is the plant from which tequila is made.  How can you not love it?!  It's a wonderful ingredient.  It adds just enough sweetness without giving you that aftertaste that honey can leave behind.  The nice thing, too, is that it is pretty readily available now in most markets.  

*Manchego cheese is a Spanish sheep's milk cheese.  It is wonderful!  I used one that was aged 6 months, but you can use a 12 month for a stronger flavor. If you do not have Manchego, you can substitute a Pecoricno Romano.


I encourage you to get out there and try something new - or revisit a dish that you never used to like - maybe you will surprise yourself.  Maybe you have had all of the ingredients listed here but if not, vow to try at least one new thing, like the agave nectar or the Manchego cheese.  Variety is the spice of life.  You never know what you might be missing!     

Thursday, April 21, 2011

Bunny Cake

I am very sorry it has been so long since my last blog!  It's been crazy with the kids off school and then I was in Delray Beach, FL for my nephew's Christening.  Took lots of pictures, ate lots of wonderful food and drank lots of good wine.  Planned on blogging all about it when I got back but then that funny thing called life got in the way.

Anyhow, since Easter is this weekend and I have mentioned this cake to a few people, I thought I would post this entry first. 

I am not going to get all preachy about making the cake and frosting from scratch.  For those of us cooking/baking this weekend, keep it as simple as possible.  If you want to use your own recipe, go for it - all the better.  If not, have Betty Crocker or Duncan Hines on standby. 

So - basically, mix up your cake mix and divide it into two greased 9 inch round cake pans.  (I cannot emphasize grease your pans enough.  As you will see from the following pictures, my cakes stuck.)  Bake according to your recipe and let cool completely.

Here comes the fun part.

Keep one round cake as is and in tact.  The second cake you will cut like so:


You want to cut two oval-ish ears and then the middle part is used as a bow tie.

Then, on a large platter, put your bunny together.  Like so:


Then, frost Mr. Bunny's head and ears white. You will need one can or the equivalent for the head and ears. 

The second can of frosting I divided and dyed 2/3 purple and 1/3 pink. 


The purple is for the bow tie and the pink is for his ears and to decorate his bow tie. Jelly beans were used for his eyes and nose and the whiskers are red licorice - Twizzlers pull and peel to be exact. (By the way, if you end up making this and are in my area, please call me.  I have an entire pack of licorice to spare.)  

Here is my finished product:


Ain't he cute?

Couple of side notes here:

First off - get creative!  If you don't have jelly beans, you can use icing or another type of candy for his eyes and nose.  Decorate his bow tie however you like.  If you don't want a bow tie on your bunny, leave it off and you'll have something to snack on while you decorate his head.  A really fun thing to do is after frosting, cover his head and ears with coconut.  Then, your bunny will look fluffy - it's very cool.

When you are coloring or dyeing the icing, I like to use the Wilton food coloring.  They come in small little jars and are great to work with.  They have the consistency of a thick gel and you only need a tiny bit to get the color you want.  This is what the jars look like:


The reason I like these, is because they add very little liquid and they do not thin out your frosting like some of the other liquid food colorings do.  Again - if you are in my area - give me a holla and I'd be glad to loan them out. I've got a rainbow of colors!

So, that's it!  The infamous bunny cake I grew up with!  Simple, festive and a fun tradition.  I know it wouldn't be Easter in my house without him.  Although - it will be this Easter since Mr. Bunny is already missing both of his ears.  What is it about those bunny ears that are so yummy?!

Have a wonderful holiday and I promise to write again soon!


Sunday, April 3, 2011

Easy Hot Artichoke Dip

I had some friends over last week and had the whole menu planned out – mushroom quiches, mustard and thyme baked brie, white & red sangria, cake pops (more on that later) etc.  Then I realized – wait a minute – there’s no dip!

See – when us ladies get together – we gotta have us some dip.

I went into the overstocked pantry closet looking for some inspiration.  A  can of artichokes caught my eye – actually, they kind of fell off the shelf and almost hit my foot - but, nonetheless...

So, I threw in a little bit of this and a little bit of that and an artichoke dip was born.  Brings a tear to my eye. I'm such a proud Momma.

The girls asked me for the recipe and I told them I just kind of winged it, threw in some cheese, mayo, etc.  They stared blankly so I told them I promised I would forward the recipe. 

Since I wanted to get all my measurements and whatnot correct, I suffered through and made the dip again for Mike on Saturday afternoon.  Poor guy - such a tough time he has testing all my recipes.

Uh, yeah.

Anyway....

Here is what you need:

1 can artichoke hearts
1 cup mayonnaise
½ cup Parmesan cheese, shredded
¼ cup Provolone cheese, shredded
¼ cup Mozzarella cheese, shredded
1 large clove or 2 small cloves minced garlic
Salt & Pepper to taste
4 dashes your choice of hot sauce

Here is what you do:

Heat oven to 375 degrees.

Drain the artichokes and chop them finely.  Or chop them chunky – they are your artichokes and it’s your dip so cut them to whatever consistency you like.


In medium bowl, mix together mayo, shredded cheeses (reserve about a Tablespoon of Parmesan to sprinkle over the top of the dip), minced garlic and salt and pepper.  I added 4 dashes of Tabasco – if you like it spicier – add some more.  If you don’t like it spicy – leave it out.  Your choice.

Toss in artichokes.  Pour the dip into an oven safe casserole dish like I have pictured below and sprinkel the reserved Parmesan cheese over the top.


Or, you can bake the dip in a hollowed out beer bread or large round bread – like a sourdough or pumpernickel loaf.   I did this for the party.  Unfortunately, we housed the whole thing before I could get a picture!

Bake the dip in the 375 degree oven for approximately 20 minutes or until it is heated through and bubbly around the edges. 


Look at that creamy, cheesy goodness.  Luscious and sexy - as any dip should be.

With this dip, feel free to get creative.  You can add some chopped scallions or onion if you’d like.  You can also squeeze a bit of lemon juice in  to give it a little fresh acidity.  You can substitute any number of cheeses.  Remember – make it your own and add what you like.

Oh, and I wanted to give a big thank you to Caron for the wine.  She knows I like my cute labels!


That guy has a lot of guts - not only is he running with scissors, but he's doing it naked.  I love it!

Go buy the wine, make the artichoke dip, have a fabulous night.  But please, do not run with the bottle - you might spill some.  And that, truly, would be a tragedy.